.NET - WPF/Silverlight treeviews and LINQ to SQL
- Date:
- Author: Stefan Cruysberghs
I was trying to learn a little bit more about WPF (.NET 3.0) styles and data binding and using my knowledge about LINQ to SQL (.NET 3.5) at the same time. So this is a small tutorial on how to create nice looking treeviews with WPF which are populated with data using LINQ to SQL on the Northwind database. Of course databinding with POCO classes or entities from the Entity Framework will work in the same way.
Update October 2008: I updated this article to point out some Silverlight issues. When you use the TreeView control from the Silverlight Toolkit almost all these WPF examples can also be used in Silverlight.
Example 1 : Treeview with categories and subnodes for their products
- LINQ to SQL : Fetching master-detail
- WPF : 2-levels databinding with TreeView
- WPF : Resources & templates
- WPF : Styles
- WPF : DataTrigger and conditional formatting
Example 2 : Treeview with countries, stockgroups and products
- LINQ to SQL : Grouping
- WPF : 3-levels databinding with TreeView
- WPF : Resources & templates
- WPF : Styles
- WPF : DataTrigger and conditional formatting
- WPF : Value converter to show language-dependent descriptions
- WPF : Value converter to get resource bitmap
Example 3 : Reorganized treeview with countries and different items for USA & UK employees
- LINQ to SQL : Inheritance
- LINQ to SQL : Grouping
- WPF : 2-levels databinding with TreeView
- WPF : Resources & templates
- WPF : Value converter to get bitmap from database
- WPF : Styles
- WPF : Image reflection
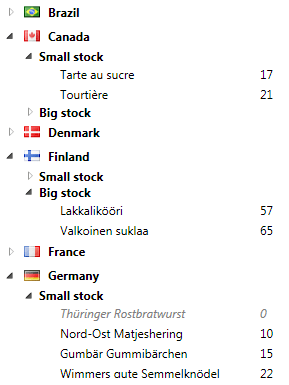
Screenshot example 2
|
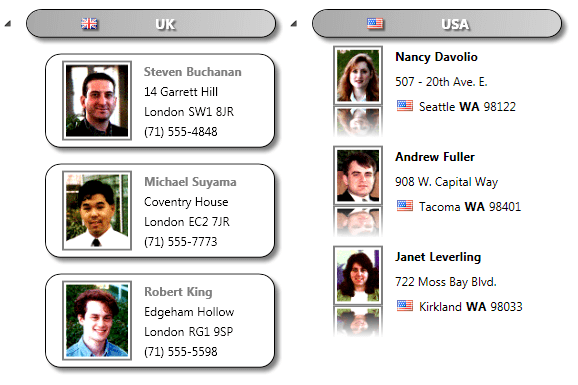
Screenshot example 3
|
Structure of the solution
1) Start creating a new solution with the structure as described :
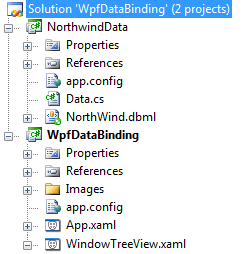 |
NortwindData (Class library)
WpfDataBinding (WPF application)
|
Example 1A
Show a treeview with categories and subnodes for their products
|
First take a look at the LINQ to SQL Object Relational Diagram from the Northwind database. In Example 1 & 2 we will use the Product, Category and Supplier entities and their associations.
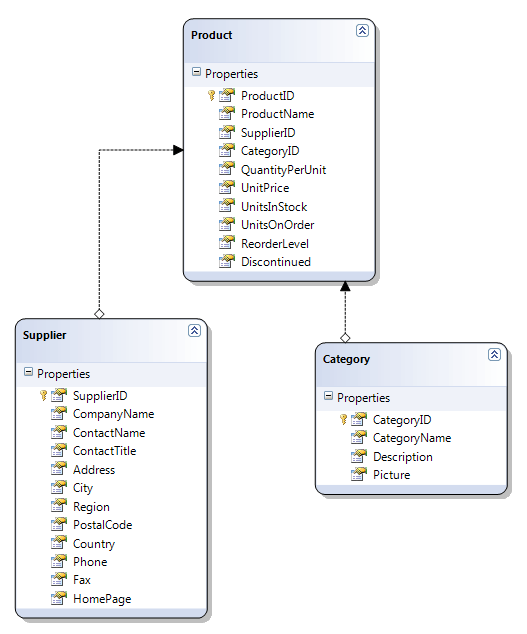
1) Open the Data.cs file in the NorthwindData project. Create a GetCategories_Products method in the DataProvider class which will return a collection of categories with their products.
There is a one-to-many association between the categories (parent) and the products (child). So if we retrieve the categories, we can have access to the collection of products. Because we like to fetch all data which are needed in one time, we need to set the LoadOptions property of the DataContext.
public class DataProvider
{
  public IEnumerable<Category> GetCategories_Products()
  {
    NorthWindDataContext dc = new NorthWindDataContext();
    DataLoadOptions options = new DataLoadOptions();
    options.LoadWith<Category>(p => p.Products);
    dc.LoadOptions = options;

    return dc.Categories;
  }
}public partial class WindowTreeView : Window
{
public WindowTreeView()
{
InitializeComponent();
NorthwindData.DataProvider dataProvider = new NorthwindData.DataProvider();
treeView1.ItemsSource = dataProvider.GetCategories_Products();
}
}3) Switch to the XAML file and add a reference called northwind to the NorthwindData namespace and assembly.
4) One of the great features of WPF is databinding. It is very easy to link object properties to the user interface. So add a TreeView component and use 3 databindings in the HierarchicalDataTemplate (main nodes) and HierarchicalDataTemplate.ItemTemplate (sub nodes) parts.
Nesting HierarchicalDataTemplates will not work in Silverlight 2 due to a limitation in the Silverlight XAML parser. Take a look at example 1C how to work around this issue in Silverlight.
<Window x:Class="WpfDataBinding.WindowTreeView"
    xmlns="http://schemas.microsoft.com/winfx/2006/xaml/presentation"
    xmlns:x="http://schemas.microsoft.com/winfx/2006/xaml"

    xmlns:northwind="clr-namespace:NorthwindData;assembly=NorthwindData"
    xmlns:local="clr-namespace:WpfDataBinding"

    Title="WindowTreeView" Height="200" Width="900" WindowState="Maximized">

    <TreeView Name="treeView1">
        <TreeView.ItemTemplate>
            <HierarchicalDataTemplate ItemsSource="{Binding Path=Products}">
                <TextBlock Text="{Binding Path=CategoryName}" />
                <HierarchicalDataTemplate.ItemTemplate>
                    <DataTemplate>
                       <TextBlock Text="{Binding Path=ProductName}" />
                    </DataTemplate>
                </HierarchicalDataTemplate.ItemTemplate>
            </HierarchicalDataTemplate>
        </TreeView.ItemTemplate>
    </TreeView>
</Window>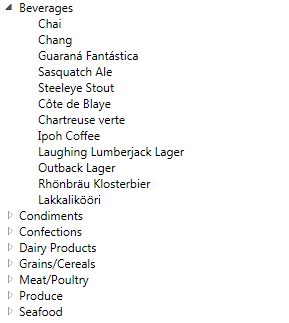
Nesting a HierarchicalDataTemplate in Silverlight isn't possible. This is a known issue. You will get a "Message: one root element" parse error. This can be solved by using templates and resources like demonstrated at the bottom of following example.
Example 1B
1B : Same data as example 1A but extended layout for product items.
|
1) Other powerful features of WPF/Silverlight are styles and templates. Let's improve the XAML code and separate and declare our templates as a Window resource. Create templates for each level of the tree. So start with a template for the Category class which uses Products as ItemsSource. In this example we will bind the template to our Northwind classes by using the DataType option.
<Window.Resources>
    <HierarchicalDataTemplate DataType="{x:Type northwind:Category}" ItemsSource="{Binding Path=Products}">
        <TextBlock Text="{Binding Path=CategoryName}"/>
    </HierarchicalDataTemplate>
</Window.Resources>
2) Create a new template for the Product class. Add a Grid and an extra TextBlock to display the UnitsInStock value.
<Window.Resources>
    <HierarchicalDataTemplate DataType="{x:Type northwind:Product}">
        <Grid>
            <Grid.ColumnDefinitions>
                <ColumnDefinition></ColumnDefinition>
                <ColumnDefinition></ColumnDefinition>
            </Grid.ColumnDefinitions>
            <TextBlock Grid.Column="0" Text="{Binding Path=ProductName}" Padding="2" Width="200" />
            <TextBlock Grid.Column="1" Text="{Binding Path=UnitsInStock}" Padding="2" />
        </Grid>
</HierarchicalDataTemplate><TreeView Name="treeView1">
</TreeView>4) Create a Style called ProductFontStyle. We will use a DataTrigger to apply conditional formatting. When the product is Discontinued, the item will be displayed in gray and italic.
<Style x:Key="ProductFontStyle">
    <Setter Property="Control.Foreground" Value="Black" />
    <Style.Triggers>
        <DataTrigger Binding="{Binding Path=Discontinued}" Value="True">
            <Setter Property="Control.Foreground" Value="Gray" />
            <Setter Property="Control.FontStyle" Value="Italic" />
        </DataTrigger>
    </Style.Triggers>
</Style><HierarchicalDataTemplate DataType="{x:Type northwind:Product}">
<Grid>
<Grid.ColumnDefinitions>
<ColumnDefinition></ColumnDefinition>
<ColumnDefinition></ColumnDefinition>
</Grid.ColumnDefinitions>
<TextBlock Grid.Column="0" Text="{Binding Path=ProductName}" Padding="2" Width="200"
Style="{StaticResource ProductFontStyle}" />
<TextBlock Grid.Column="1" Text="{Binding Path=UnitsInStock}" Padding="2"
Style="{StaticResource ProductFontStyle}" />
</Grid>
</HierarchicalDataTemplate>6) Run the application.
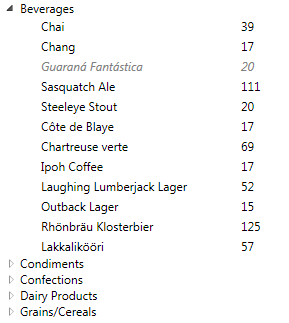
The HierarchicalDataTemplate in Silverlight does not provide a DataType property. So you have to specify a name and assign the ItemTemplate property.
<HierarchicalDataTemplate x:Name="ProductTemplate">
    <Grid>
        <Grid.ColumnDefinitions>
            <ColumnDefinition></ColumnDefinition>
            <ColumnDefinition></ColumnDefinition>
        </Grid.ColumnDefinitions>
        <TextBlock Grid.Column="0" Text="{Binding Path=ProductName}" Padding="2" Width="200"
            Style="{StaticResource ProductFontStyle}" />
        <TextBlock Grid.Column="1" Text="{Binding Path=UnitsInStock}" Padding="2"
            Style="{StaticResource ProductFontStyle}" />
    </Grid>
</HierarchicalDataTemplate>
<TreeView Name="treeView1">
<TreeView.ItemTemplate>
<HierarchicalDataTemplate
ItemsSource="{Binding Path=Products}"
ItemTemplate="{StaticResource ProductTemplate}">
<TextBlock Text="{Binding Path=CategoryName}" />
</HierarchicalDataTemplate>
</TreeView.ItemTemplate>
</TreeView>Example 1C
1C : Same data as example 1A & 1B but with different templates
|
1) Another way to create templates is to give them a key value (x:Key) and refer to this resource in your treeview component. Because Silverlight doesn't support the x:Type markup extension (see example 1B), following technique is the way to go in a Silverlight 2 application. Of course this also works perfectly in WPF.
<Window.Resources>
    <HierarchicalDataTemplate x:Key="CategoryTemplate" ItemsSource="{Binding Path=Products}" ItemTemplate="{StaticResource ProductTemplate}">
        <TextBlock Text="{Binding Path=CategoryName}"/>
    </HierarchicalDataTemplate>

    <HierarchicalDataTemplate x:Key="ProductTemplate">
        <Grid>
            <Grid.ColumnDefinitions>
                <ColumnDefinition></ColumnDefinition>
                <ColumnDefinition></ColumnDefinition>
            </Grid.ColumnDefinitions>
            <TextBlock Grid.Column="0" Text="{Binding Path=ProductName}" Padding="2" Width="200" />
            <TextBlock Grid.Column="1" Text="{Binding Path=UnitsInStock}" Padding="2" />
        </Grid>
   </HierarchicalDataTemplate>
<TreeView Name="treeView1" ItemTemplate="{StaticResource CategoryTemplate}">
</TreeView>
If you're using ViewModels and a M-V-VM pattern then you also have to specify the ItemSource of the TreeView and bind it with a collection property of your ViewModel class.
<TreeView Name="treeView1" ItemTemplate="{StaticResource CategoryTemplate}" ItemsSource="{Binding CategoryProducts}">
</TreeView>
Example 2A
2A : Show a treeview with supplier countries, stockgroups (small and large) and products.
|
1) In this example we will not use the associations between entities to create hierarchical data. Instead we will use the GroupBy LINQ to SQL operator. The GroupBy operator will return a sequence of IGrouping values, one for each distinct key value that was encountered. Anonymous types can only be used locally, so if we want to pass the data of these LINQ queries around, we need to create our own hierarchical data transfer objects (DTO).
So create a custom SupplierCountryStockGroup and UnitsInStockGroup class in the Data.cs file in the NorthwindData project.
namespace NorthwindData
{
  public class SupplierCountryStockGroup
  {
    public string Country { get; set; }
    public IEnumerable<UnitsInStockGroup> StockGroups { get; set; }
  }

  public class UnitsInStockGroup
  {
    public string Country { get; set; }
    public bool StockGroup { get; set; }
    public IEnumerable<Product> Products { get; set; }
  }
}
2) Add a new method GetSupplierCountries_StockGroups_Products to the DataProvider class. This method will execute a LINQ to SQL query and return an IEnumerable of SupplierCountryStockGroup items. The method contains a main and sub query.
- Sub query : Create 2 groups of products; stock smaller then 50 units and stock larger then 50 units. Save these grouped products in UnitsInStockGroup items.
- Main query : Use the UnitsInStockGroup items and create a group for each supplier country. These results are stored in SupplierCountryStockGroup items.
namespace NorthwindData
{
  public class DataProvider
  {
    NorthWindDataContext dc;

    public DataProvider()
    {
      dc = new NorthWindDataContext();
    }

    public IEnumerable<SupplierCountryStockGroup> GetSupplierCountries_StockGroups_Products()
    {
      var GroupedProducts = from p in dc.Products.OrderBy(o => o.UnitsInStock)
                            where p.UnitsInStock != null
                            group p by new { Country = p.Supplier.Country, StockGroup = p.UnitsInStock > 50 } into gr
                            select new UnitsInStockGroup()
                              { Country = gr.Key.Country, StockGroup = gr.Key.StockGroup, Products = gr };

      return from p in GroupedProducts
             group p by new { Country = p.Country } into gr
             select new SupplierCountryStockGroup() { Country = gr.Key.Country, StockGroups = gr };
    }
  }
}
3) Add two HierarchicalDataTemplates for level 1 (Country) and level 2 (StockGroup) in the XAML file. The Product template (from example 1) can be reused for level 3.
<HierarchicalDataTemplate DataType="{x:Type northwind:SupplierCountryStockGroup}" ItemsSource="{Binding Path=StockGroups}" >
    <Grid>
        <TextBlock Grid.Column="1" Text="{Binding Path=Country}" FontWeight="Bold" Margin="4" />
    </Grid>
</HierarchicalDataTemplate>

<HierarchicalDataTemplate DataType="{x:Type northwind:UnitsInStockGroup}" ItemsSource="{Binding Path=Products}">
    <TextBlock Text="{Binding Path=StockGroup}" FontWeight="Bold" />
</HierarchicalDataTemplate>
<TreeView Name="treeView2">
</TreeView>4) Call the GetSupplierCountries_StockGroups_Products method in the partial Window class and set the ItemSource.
public partial class WindowTreeView : Window
{
  public WindowTreeView()
  {
    InitializeComponent();

    NorthwindData.DataProvider dataProvider = new NorthwindData.DataProvider();

    treeView2.ItemsSource = dataProvider.GetSupplierCountries_StockGroups_Products();
  }
}
Example 2B
2B : Create 2 value converter classes to improve the layout
|
1) The UnitsInStockGroup class has a boolean StockGroup property. This boolean value is the second level in our treeview. I would like to change this True/False value and display a language-dependent description. Value Converters are a great tool for formatting data in WMF.
Therefore let's create a UnitsInStockGroupValueConverter class which implements the IValueConverter interface. We need a one-way conversion so only implement the Convert method. Check the culture parameter to decide which language is being used.
public class UnitsInStockGroupValueConverter : IValueConverter
{
  public object Convert(object value, Type targetType, object parameter, System.Globalization.CultureInfo culture)
  {
    if ((bool)value)
    {
      if (culture.TwoLetterISOLanguageName == "nl")
        return "Grote stock";
      else
        return "Big stock";
    }
    else
    {
      if (culture.TwoLetterISOLanguageName == "nl")
        return "Kleine stock";
      else
        return "Small stock";
    }
  }

  public object ConvertBack(object value, Type targetType, object parameter, System.Globalization.CultureInfo culture)
  {
    throw new NotSupportedException();
  }
}
2) It would be nice to show a bitmap of the flag of the supplier country in the main nodes. So I downloaded some flag icons (http://www.famfamfam.com/lab/icons/flags), renamed them and added the ones I needed to the Images folder in my project.
Now it is quite easy to create a new CountryFlagConverter class which returns a resource bitmap. The value parameter of the Convert method will contain the country name.
public class CountryFlagConverter : IValueConverter
{
  public object Convert(object value, Type targetType, object parameter,
    System.Globalization.CultureInfo culture)
  {
    if (value != null)
      return new BitmapImage(new Uri("Images/"+value.ToString()+".png", UriKind.Relative));
    else
      return null;
  }

  public object ConvertBack(object value, Type targetType, object parameter,
    System.Globalization.CultureInfo culture)
  {
    throw new NotSupportedException();
  }
}
3) Create an instance of each ValueConverter class in the XAML file.
<local:CountryFlagConverter x:Key="CountryFlagConverter"></local:CountryFlagConverter>
<local:UnitsInStockGroupValueConverter x:Key="UnitsInStockGroupValueConverter" />
4) Use the converters in the HierarchicalDataTemplates.
<HierarchicalDataTemplate DataType="{x:Type northwind:SupplierCountryStockGroup}" ItemsSource="{Binding Path=StockGroups}" >
    <Grid>
        <Grid.ColumnDefinitions>
            <ColumnDefinition></ColumnDefinition>
            <ColumnDefinition></ColumnDefinition>
        </Grid.ColumnDefinitions>
        <Image Grid.Column="0" Margin="4" Stretch="None"
          Source="{Binding Path=Country, Converter={StaticResource CountryFlagConverter}}" />
        <TextBlock Grid.Column="1" Text="{Binding Path=Country}" FontWeight="Bold" Margin="4" />
    </Grid>
</HierarchicalDataTemplate>

<HierarchicalDataTemplate DataType="{x:Type northwind:UnitsInStockGroup}" ItemsSource="{Binding Path=Products}">
    <TextBlock Text="{Binding Path=StockGroup, Converter={StaticResource UnitsInStockGroupValueConverter}}" FontWeight="Bold" />
</HierarchicalDataTemplate>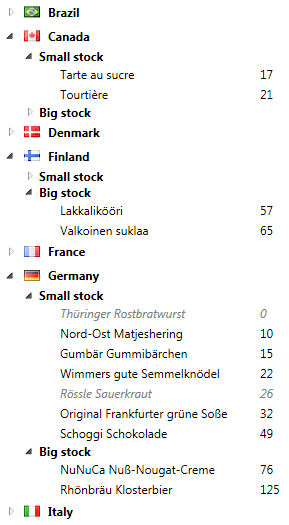
Example 3
3 : Show a reorganized treeview with countries and different items for USA & UK employees. Display the photo of the employee and use advanced styling techniques.
|
1) Create 2 new derived classes UKEmployee and USAEmployee. See my LINQ to SQL - part 2 - Inheritance article for more information about inheritance with LINQ to SQL.
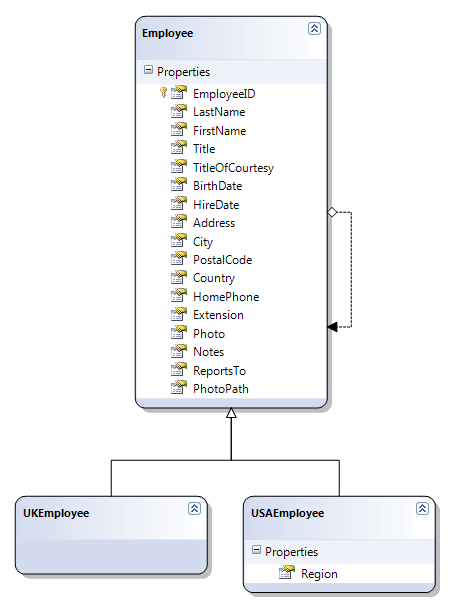
2) Create a custom EmployeeCountry class and add a GetCountries_Employees method in the DataProvider class.
namespace NorthwindData
{

  public class EmployeeCountry
  {
    public string Country { get; set; }
    public IEnumerable<Employee> Employees { get; set; }
  }

  public class DataProvider
  {
    NorthWindDataContext dc;

    public DataProvider()
    {
      dc = new NorthWindDataContext();
    }

    public IEnumerable<EmployeeCountry> GetCountries_Employees()
    {
      return from e in dc.Employees
             group e by e.Country into gr
             select new EmployeeCountry() { Country = gr.Key, Employees = gr };
    }
  }
}public partial class WindowTreeView : Window
{
public WindowTreeView()
{
InitializeComponent();
NorthwindData.DataProvider dataProvider = new NorthwindData.DataProvider();
treeView3.ItemsSource = dataProvider.GetCountries_Employees();
}
}4) The photos of the employees are stored in the database as an array of bytes (Photo field in table Employee). We need to implement an ImageBytesConverter class which will read the bytes into a memory stream and return a WPF BitmapImage.
public class ImageBytesConverter : IValueConverter
{
  public object Convert(object value, Type targetType, object parameter,
    System.Globalization.CultureInfo culture)
  {
    BitmapImage bitmap = new BitmapImage();
    if (value != null)
    {
      byte[] photo = (byte[])value;
      MemoryStream stream = new MemoryStream();

      // Work-around to make Northwind images work
      int offset = 78;
      stream.Write(photo, offset, photo.Length - offset);

      bitmap.BeginInit();
      bitmap.StreamSource = stream;
      bitmap.EndInit();
    }
    return bitmap;
  }

  public object ConvertBack(object value, Type targetType, object parameter,
    System.Globalization.CultureInfo culture)
  {
    throw new NotSupportedException();
  }
}
5) Create an instance of the ImageBytesConverter class in the XAML file.
<local:ImageBytesConverter x:Key="ImageBytesConverter"></local:ImageBytesConverter><Style x:Key="GroupBorderStyle" TargetType="Border">
<Setter Property="Control.BorderBrush" Value="Black" />
<Setter Property="Control.BorderThickness" Value="1" />
<Setter Property="Control.Margin" Value="8" />
<Setter Property="Control.Padding" Value="5" />
<Setter Property="Border.CornerRadius" Value="15" />
<Setter Property="Control.Background">
<Setter.Value>
<LinearGradientBrush>
<LinearGradientBrush.GradientStops>
<GradientStop Offset="0.00" Color="DarkGray" />
<GradientStop Offset="1.00" Color="LightGray" />
</LinearGradientBrush.GradientStops>
</LinearGradientBrush>
</Setter.Value>
</Setter>
<Setter Property="Control.BitmapEffect">
<Setter.Value>
<DropShadowBitmapEffect Color="Black" Direction="315" ShadowDepth="5" Softness="0.25" Opacity="0.5"/>
</Setter.Value>
</Setter>
</Style>
<Style x:Key="ShadowStyle">
<Setter Property="Control.BitmapEffect">
<Setter.Value>
<DropShadowBitmapEffect Color="Black" Direction="315" ShadowDepth="3" Softness="0.1" Opacity="0.5"/>
</Setter.Value>
</Setter>
</Style><HierarchicalDataTemplate DataType="{x:Type northwind:EmployeeCountry}" ItemsSource="{Binding Path=Employees}">
<Border Style="{StaticResource GroupBorderStyle}" Width="250">
<Grid>
<Grid.ColumnDefinitions>
<ColumnDefinition>
</ColumnDefinition>
<ColumnDefinition>
</ColumnDefinition>
</Grid.ColumnDefinitions>
<Image Grid.Column="0" Width="16" Margin="4" Style="{StaticResource ShadowStyle}"
Source="{Binding Path=Country, Converter={StaticResource CountryFlagConverter}}" >
</Image>
<TextBlock Grid.Column="1" TextAlignment="Left" Style="{StaticResource ShadowStyle}"
Text="{Binding Path=Country}" Foreground="White" FontSize="14" FontWeight="Bold" Margin="4" >
</TextBlock>
</Grid>
</Border>
</HierarchicalDataTemplate><HierarchicalDataTemplate DataType="{x:Type northwind:UKEmployee}">
<Border Style="{StaticResource GroupBorderStyle}" Background="White" Width="230">
<Grid Margin="6">
<Grid.ColumnDefinitions>
<ColumnDefinition>
<ColumnDefinition.Width>90</ColumnDefinition.Width>
</ColumnDefinition>
<ColumnDefinition></ColumnDefinition>
</Grid.ColumnDefinitions>
<Grid.RowDefinitions>
<RowDefinition>
<RowDefinition.Height>20</RowDefinition.Height>
</RowDefinition>
<RowDefinition>
<RowDefinition.Height>20</RowDefinition.Height>
</RowDefinition>
<RowDefinition>
<RowDefinition.Height>20</RowDefinition.Height>
</RowDefinition>
<RowDefinition>
<RowDefinition.Height>20</RowDefinition.Height>
</RowDefinition>
</Grid.RowDefinitions>
<StackPanel Grid.Row="0" Grid.Column="0" Grid.RowSpan="4" Height="80" Width="70">
<Border x:Name="USAEmployeePhoto" BorderBrush="Gray" BorderThickness="2"
HorizontalAlignment="Center" VerticalAlignment="Center">
<Border BorderBrush="White" BorderThickness="2">
<Image Stretch="UniformToFill"
HorizontalAlignment="Left"
Source="{Binding Path=Photo, Converter={StaticResource ImageBytesConverter}}">
</Image>
</Border>
</Border>
</StackPanel>
<WrapPanel Grid.Row="0" Grid.Column="1">
<TextBlock Text="{Binding Path=FirstName}" Padding="2" Foreground="Gray" FontWeight="Bold"/>
<TextBlock Text="{Binding Path=LastName}" Padding="2" Foreground="Gray" FontWeight="Bold" />
</WrapPanel>
<TextBlock Grid.Row="1" Grid.Column="1" Text="{Binding Path=Address}" Padding="2" />
<WrapPanel Grid.Row="2" Grid.Column="1">
<TextBlock Text="{Binding Path=City}" Padding="2" />
<TextBlock Text="{Binding Path=PostalCode}" Padding="2" />
</WrapPanel>
<WrapPanel Grid.Row="3" Grid.Column="1">
<TextBlock Text="{Binding Path=HomePhone}" Padding="2" />
</WrapPanel>
</Grid>
</Border>
</HierarchicalDataTemplate><HierarchicalDataTemplate DataType="{x:Type northwind:USAEmployee}">
<Grid>
<Grid.ColumnDefinitions>
<ColumnDefinition>
<ColumnDefinition.Width>70</ColumnDefinition.Width>
</ColumnDefinition>
<ColumnDefinition></ColumnDefinition>
</Grid.ColumnDefinitions>
<Grid.RowDefinitions>
<RowDefinition>
<RowDefinition.Height>25</RowDefinition.Height>
</RowDefinition>
<RowDefinition>
<RowDefinition.Height>25</RowDefinition.Height>
</RowDefinition>
<RowDefinition>
<RowDefinition.Height>50</RowDefinition.Height>
</RowDefinition>
</Grid.RowDefinitions>
<StackPanel Grid.Row="0" Grid.Column="0" Grid.RowSpan="4" Height="100" Width="50">
<Border x:Name="USAEmployeePhoto" BorderBrush="Gray" BorderThickness="2"
HorizontalAlignment="Center" VerticalAlignment="Center" Height="60">
<Border BorderBrush="White" BorderThickness="2">
<Image Stretch="UniformToFill"
HorizontalAlignment="Left"
Source="{Binding Path=Photo, Converter={StaticResource ImageBytesConverter}}">
</Image>
</Border>
</Border>
<Border Height="40">
<Border.Background>
<VisualBrush Visual="{Binding ElementName=USAEmployeePhoto}">
<VisualBrush.Transform>
<ScaleTransform ScaleX="1" ScaleY="-1" CenterX="10" CenterY="20"></ScaleTransform>
</VisualBrush.Transform>
</VisualBrush>
</Border.Background>
<Border.OpacityMask>
<LinearGradientBrush StartPoint="0,0" EndPoint="0,1">
<GradientStop Offset="0.0" Color="Black"></GradientStop>
<GradientStop Offset="0.8" Color="Transparent"></GradientStop>
</LinearGradientBrush>
</Border.OpacityMask>
</Border>
</StackPanel>
<WrapPanel Grid.Row="0" Grid.Column="1">
<TextBlock Text="{Binding Path=FirstName}" Padding="2" FontWeight="Bold"/>
<TextBlock Text="{Binding Path=LastName}" Padding="2" FontWeight="Bold" />
</WrapPanel>
<TextBlock Grid.Row="1" Grid.Column="1" Text="{Binding Path=Address}" Padding="2" />
<WrapPanel Grid.Row="2" Grid.Column="1">
<Image Width="16" Margin="4"
Source="{Binding Path=Country, Converter={StaticResource CountryFlagConverter}}" />
<TextBlock Text="{Binding Path=City}" Padding="2" />
<TextBlock Text="{Binding Path=Region}" Padding="2" FontWeight="Bold" />
<TextBlock Text="{Binding Path=PostalCode}" Padding="2" />
</WrapPanel>
</Grid>
</HierarchicalDataTemplate>10) Finally, change the ItemsPanel template. We would like to arrange the root items (EmployeeCountry) in a horizontal row. Therefore add a StackPanel with a Horizontal Orientation.
<TreeView Name="treeView3">
    <TreeView.ItemsPanel>
        <ItemsPanelTemplate>
            <StackPanel IsItemsHost="True" Orientation="Horizontal" />
        </ItemsPanelTemplate>
    </TreeView.ItemsPanel>
</TreeView>
11) The result demonstrates the power of WPF/Silverlight and LINQ. With a minimum of efforts we created a reorganized treeview with photos of the employees. The treeview uses different layouts for UK and USA employee items which are retrieved from a SQL Server database.
