.NET - ASP.NET WebAPI services and Windows Integrated Authentication
- Date:
- Author: Stefan Cruysberghs
A few of weeks ago I was creating an internal web project for my company to automate some TFS and Azure tasks. Therefore I created a simple ASP.NET website with Bootstrap and JQuery and I implemented some WebAPI REST services to call my server logic. I needed to implement authentication and because it is hosted on our intranet I have chosen Windows authentication. This is quite easy to configure and implement but the information on the internet is quite fragmented so I decided to write a detailed article about WebAPI 2.2 services and Windows Integrated Authentication (WIA).
- ASP.NET templates
- WebAPI controller
- Web.config
- Fiddler and browsers
- IIS Express and IIS
- Authentication attributes and filters
- .NET client
- HTML/Javascript client
ASP.NET templates
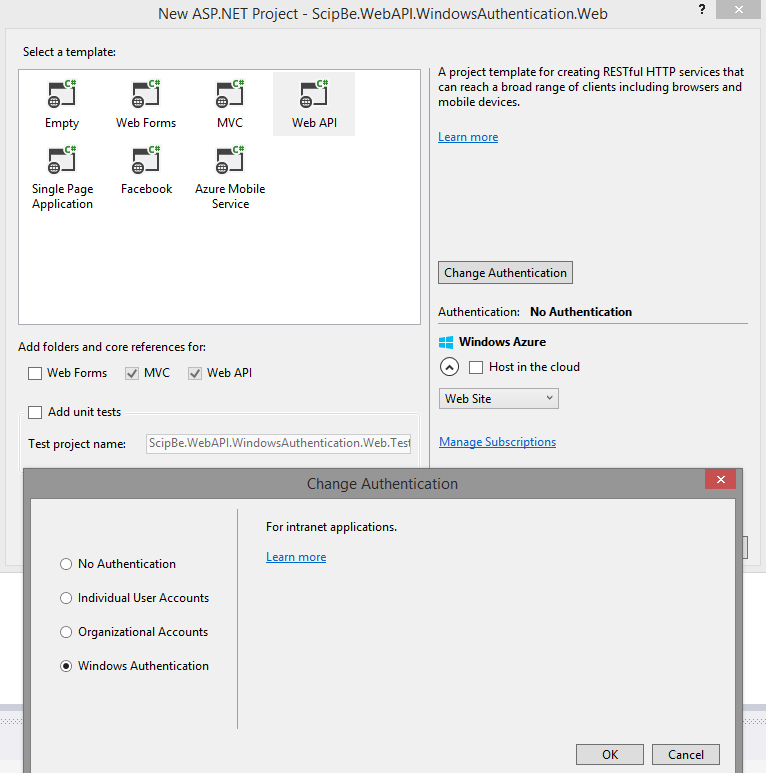
When you start a new ASP.NET project in Visual Studio 2013 you can select one of the predefined templates. When you choose Web Forms, MVC or WebAPI (with MVC) you will get the option to specify the authentication type. Automatically all classes and configuration of ASP.NET Identity will be added. You have several choices:
- User authentication which stores the user profiles in a SQL database with an Entity Framework data model and which offers optional authentication with Facebook, Twitter, Google and Microsoft accounts.
- Organizational accounts which uses Active Directory or Azure Active Directory.
- Windows authentication that uses the local domain user and that is intended for intranet sites.
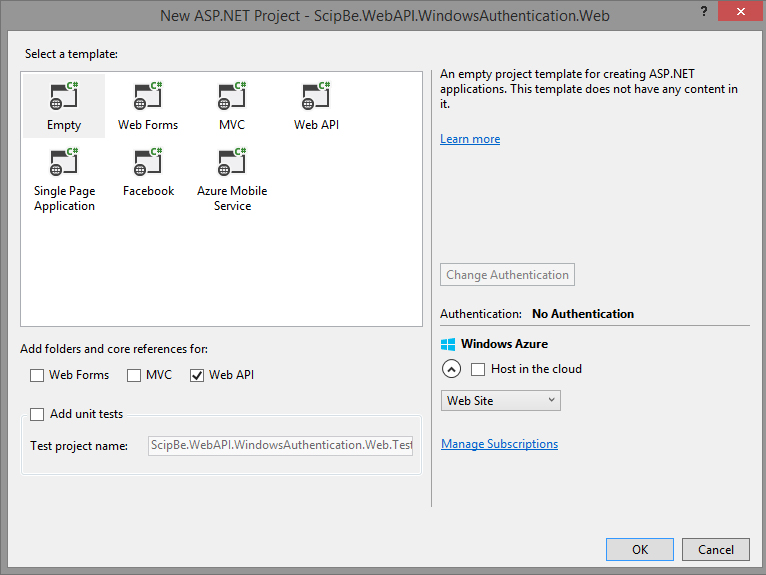
I just wanted to create a simple Single Page Application (SPA) without MVC so I selected the Empty ASP.NET Project template and only checked the option WebAPI. This template does not include any authentication so you have to modify it yourself afterwards.
WebAPI controller
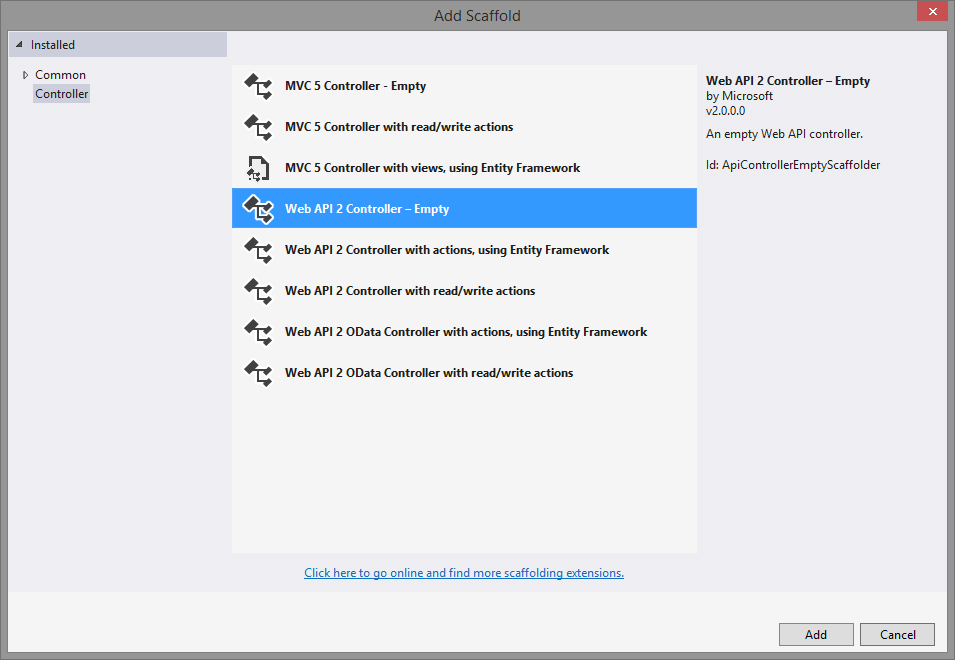
For this demo I created a very simple WebAPI REST service. So I added a new empty API controller:
I implemented a TestAuthentication method/action with a fixed route path. For the demo I do not include Authorize attributes yet. The code checks the User property of the ApiController. This contains the same data as Thread.CurrentPrincipal or HttpContext.Current.User. Make sure Anonymous Authentication in IIS is disabled otherwise the Identity.Name will be empty.
public class WinAuthController : ApiController
{
    [HttpGet]
    [Route("api/testauthentication")]
    public IHttpActionResult TestAutentication()
    {
        Debug.Write("AuthenticationType:" + User.Identity.AuthenticationType);
        Debug.Write("IsAuthenticated:" + User.Identity.IsAuthenticated);
        Debug.Write("Name:" + User.Identity.Name);

        if (User.Identity.IsAuthenticated)
        {
            return Ok("Authenticated: " + User.Identity.Name);
        }
        else
        {
            return BadRequest("Not authenticated");
        }
    }
}
Web.config
To configure Windows Integrated Authentication (WIA) you only have to add the Windows authentication mode in the web.config file of the ASP.NET project:
 <system.web>
   <authentication mode="Windows" />
 </system.web>
Fiddler and browsers
Now you can test the WebAPI call in a browser or with the Composer feature of Fiddler. If you are using a browser, then make sure the the browser has enabled Windows Integrated Authentication. In all latest versions of Microsoft Internet Explorer, Mozilla FireFox and Google Chrome this will be enabled by default.
Microsoft Internet Explorer
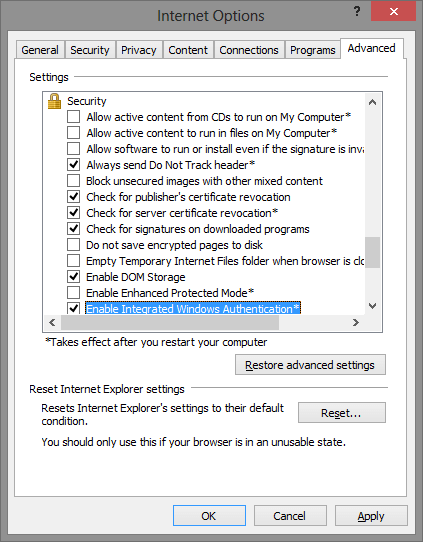
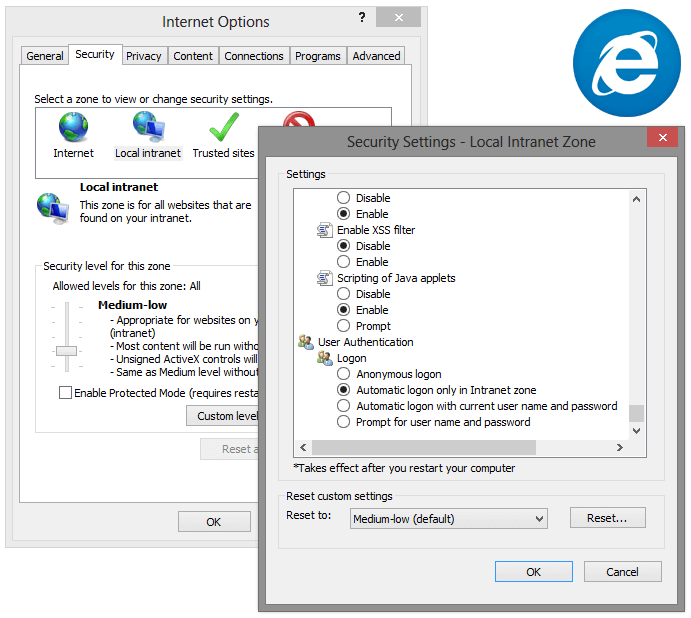
In IE you can check the setting with Tools > Internet Options > Advanced and look for a setting Enable Windows Integrated Authentication. When you go to the tab Security and then Intranet and Custom Level, then you will find a setting at the bottom to specify if IE should logon automatically or prompt for the username and password.
Google Chrome
Chrome uses the same IE settings.
Mozilla FireFox
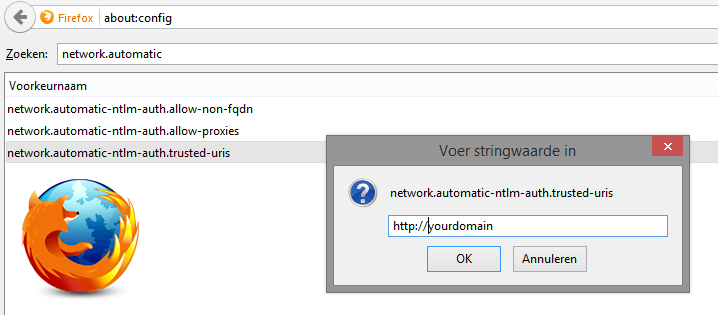
Firefox automatically supports Windows Integrated Authentication but by default it will prompt for the username and password. If you want to change this, then you have to go the the settings of FireFox. So type about:config in the address bar and look for network.automatic-ntlm-auth.trusted-uris and enter the url of your intranet server. You can add multiple sites by comma delimiting them.
IIS Express & IIS
Maybe it is still not working and returning a 401 Unauthorized message. When using IIS Express you have to change a configuration setting. Look for the ApplicationHost.config in your “My Documents\IISExpress\config” folder. There you have to add:
<windowsAuthentication enabled="true">When you will host you application in IIS 7 or higher, then you have to do the same. You can also modify this in the ApplicationHost.config file which can be found in the “system32\inetsrv” folder. But it is easier to change it in the Internet Information Services Manager. Go to Authentication and enable the Windows Authentication module.

When you call the method again you will see that you will be authenticated with your local account. It is interesting to see in Fiddler what happens with your calls.
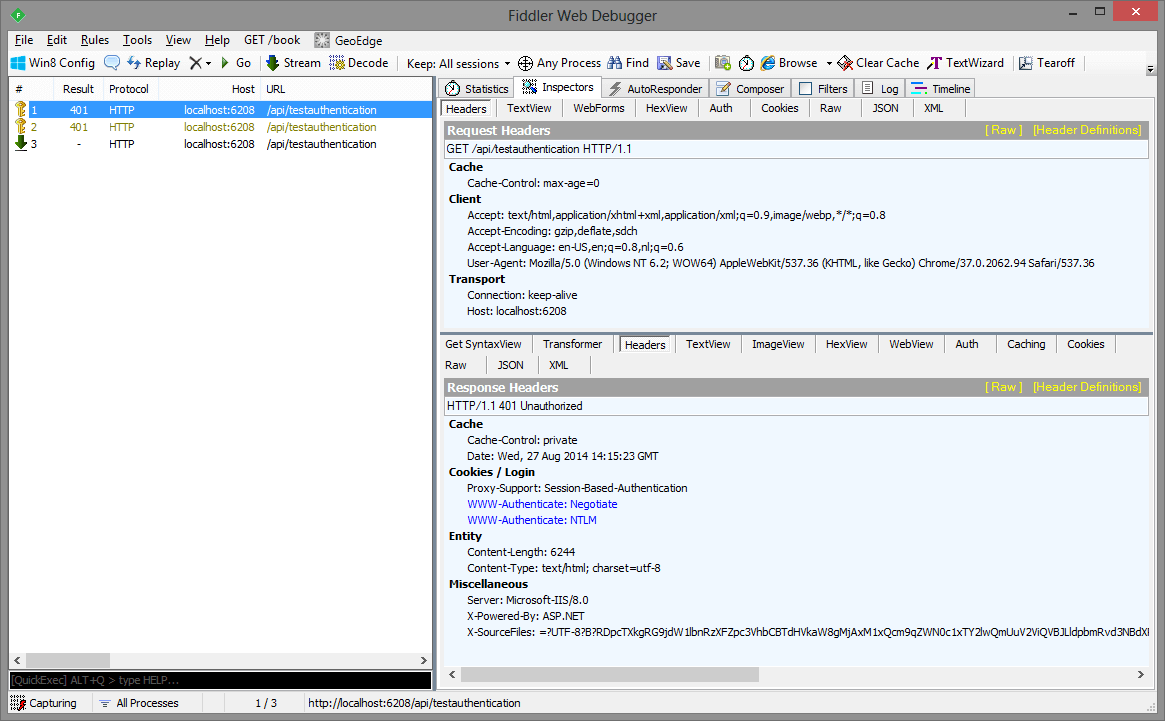
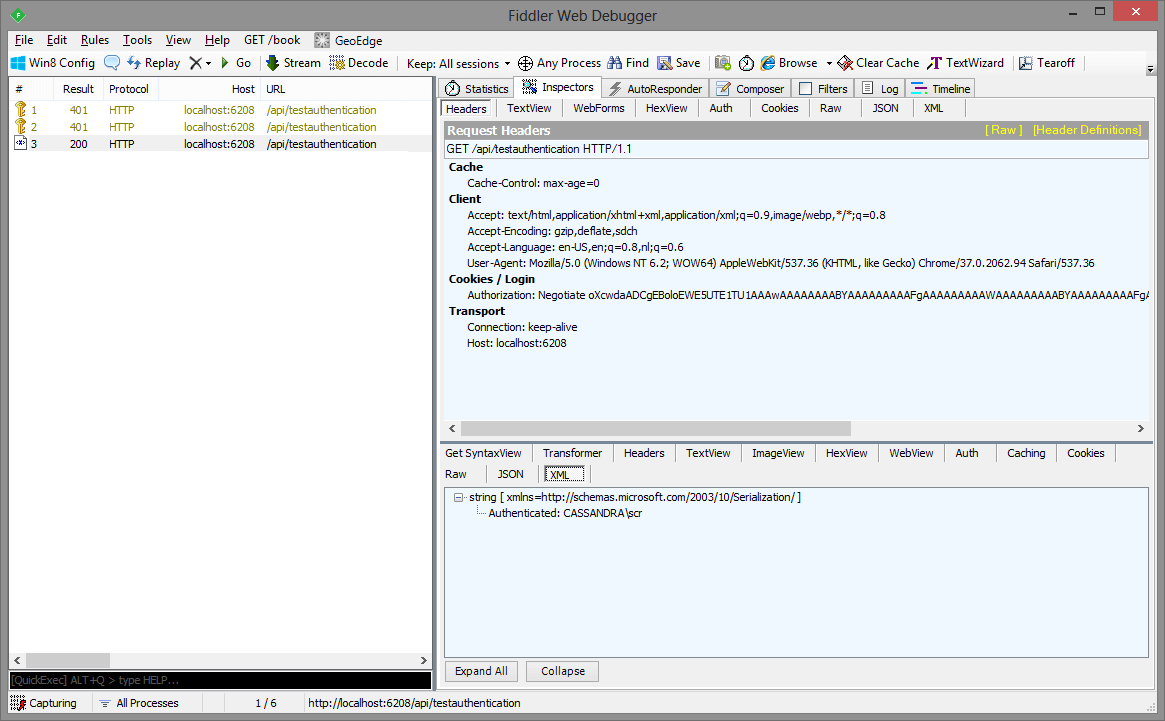
There are 3 calls to the server and only the last one returns status code 200 and the expected data. Windows Integrated Authentication (WIA) utilizes Negotiate/Kerberos or NTLM to authenticate users based on an encrypted ticket that is send between the client and server. The initial request does not include any authorization so it is anonymous. Then IIS (Express) will return a 401 (Unauthorized) message together with a list of authentication protocols that the server (IIS) supports. In this case it is Negotiate en NTLM. Then the browser reads the supported authentication providers, it will use the Negotiate authentication provider and send an encrypted security ticket to Active Directory, this will return the Kerberos token. Finally this Kerberos taken will be send back to IIS. If IIS can authenticate it, then it will return an 200 message together with your data.
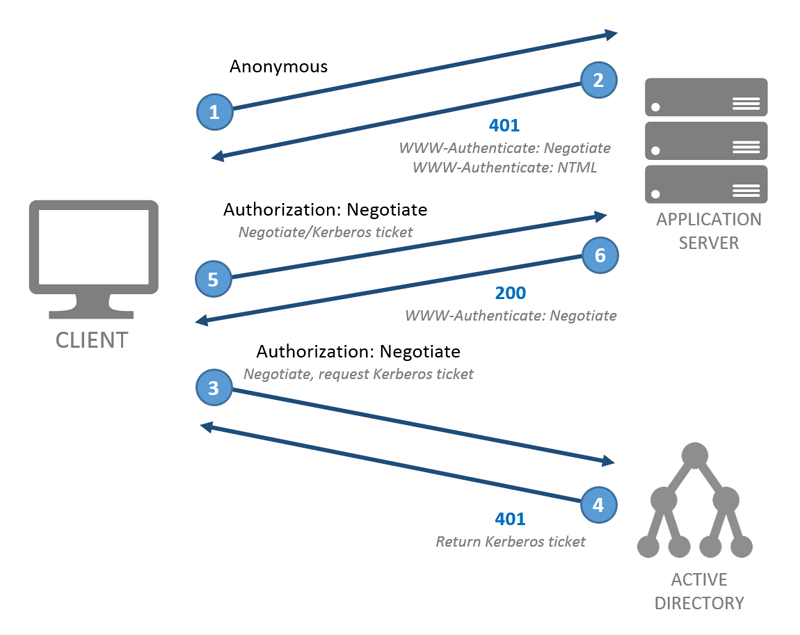
So be aware of these extra round trips from client to server. Windows Integrated Authentication will re-authenticated for each HTTP request and this will increase the network traffic! If you want to avoid this, then you can set the property authPersistSingleRequest of windows authentication to true in the ApplicationHost.config file of IIS (Express). Once the client is authenticated, next subsequent requests should only take one request.
<windowsAuthentication enabled="true" authPersistSingleRequest="true">Authentication attributes and filters
Web API provides a built-in authorization filter called AuthorizeAttribute. This can be set on the specific method/action or it can be applied to the whole ApiController. This filter attribute verifies the request's IPrincipal and it has some extra properties to check for specific users or roles. If user authentication fails then HTTP status code 401 (Unauthorized) is returned.
[Authorize]
[HttpGet]
[Route("api/testauthentication")]
public IHttpActionResult TestAutentication()
[Authorize(Roles = "Administrators")]
[HttpGet]
[Route("api/testauthentication")]
public IHttpActionResult TestAutentication()
If you want to restrict access for all WebAPI controllers, then you can add the AuthorizeAttribute filter to the global filter list in the static WebApiConfig class.
public static class WebApiConfig
{
    public static void Register(HttpConfiguration config)
    {
        config.Filters.Add(new AuthorizeAttribute());

        ...
    }
}
.NET client
Now that we know that the service is working with Windows Authentication we can create some clients apps. The first example is a simple .NET console application. There are several ways to call a WebAPI REST service (HttpWebRequet, WebClient, …) but the easiest way is using the HttpClient class which is included in the NuGet package Microsoft.AspNet.WebApi.Client.
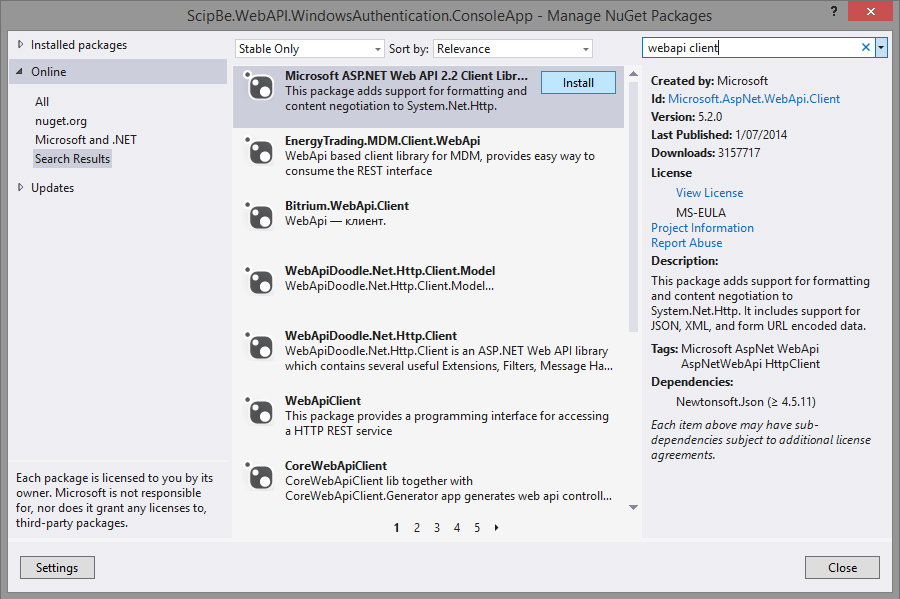
Once you have created a HttpClient you only have to specify the URL and call the GetAsync method and check the response. Because we want to use Windows Authentication you will have to add something extra. Create an instance of HttpClientHandler, set the option UseDefaultCredentials to true and pass this to the constructor of the HttpClient.
class Program
{
    static void Main(string[] args)
    {
        TestAutentication().Wait();
        Console.ReadKey();
    }

    static async Task TestAutentication()
    {
        HttpClientHandler handler = new HttpClientHandler();
        handler.UseDefaultCredentials = true;
        using (var client = new HttpClient(handler))
        {

            client.BaseAddress = new Uri("http://localhost:6208");

            try
            {
                HttpResponseMessage response = await client.GetAsync("api/testauthentication");
                if (response.IsSuccessStatusCode)
                {
                    var result = await response.Content.ReadAsAsync<string>();
                    Console.WriteLine("{0}", result);
                }
                else
                {
                    Console.WriteLine("{0}", response.ReasonPhrase);
                }

            }
            catch (HttpRequestException ex)
            {
                Console.WriteLine("{0}", ex.Message);
            }

        }
    }
}
HTML/Javascript client
I also created a simple web page with a button and a JQuery Ajax call to the WebAPI REST service. You only have to specify the URL, the HTTP method and the datatype. When using Windows Authentication you also have to set the withCredentials property of the xhrFields object to true so it will pass the user with cross-domain requests.
<!DOCTYPE html>
<html xmlns="http://www.w3.org/1999/xhtml">
<head>
    <title>SCIP.be WebAPI Windows Authentication demo</title>

    <link href="Content/bootstrap.min.css" rel="stylesheet">

    <script src="Scripts/jquery-2.1.1.min.js"></script>

    <script language="javascript">

        $(document).ready(function () {

            $("#buttonTestAuthentication").click(function () {

                $.ajax({
                    url: 'api/testauthentication',
                    type: 'GET',
                    dataType: 'json',
                    xhrFields: {
                        withCredentials: true
                    }
                    })
                    .done(function (data) {
                        $('#result').text(data);
                    })
                    .fail(function (jqXHR, textStatus, errorThrown) {
                        $('#result').text(textStatus);
                    });
            });
        });

    </script>
</head>
<body>
    <h1>SCIP.be WebAPI Windows Authentication demo</h1>
    <button id="buttonTestAuthentication">Test authentication</button>
    <span id='result'></span>
</body>
</html>
I hope you like this small tutorial about ASP.NET WebAPI 2.2 services and Windows Authentication. If you have any questions, suggestions or comments, be sure to let me know.
