.NET - Customized tasks in VSTS builds
- Date:
- Author: Stefan Cruysberghs
A couple of years ago Microsoft started extending their Team Foundation Server (TFS) software to the cloud. Nowadays this is called Visual Studio Team Services (VSTS) and it covers the entire application lifecycle and offers work tracking, version control, continuous integration, testing, deployment, … It supports many languages and tools, is open for extensions and it is a great product for all kinds of teams and companies. You can also setup a free account to use it at home.
https://www.visualstudio.com/en-us/products/visual-studio-team-services-vs.aspx
In this article I'm going to focus on the different techniques how you can customize your build process by executing PowerShell scripts and C# .NET code and how to pass arguments.
VSTS Build definitions
In Microsoft Team Foundation Server (TFS) 2013 and before we were able to customize the build process by implementing custom activity classes and adding them to your XAML build workflow. In my company we created several custom activities to update the version number, to update settings and configuration files, to deploy an integration-test database, to deploy our software to different Azure web and worker roles, … In the new online Visual Studio Team Services (VSTS) the XAML builds are still supported but only when your build-server is on-premise. In VSTS these XAML builds will be deprecated in September 2016 so it is time to upgrade to VSTS Build 2015. VSTS Build 2015 (previously called vNext) is radically different to the old XAML based workflows. It is much easier to setup and it offers more features because of the many build tasks that are available out of the box. It offers tasks to build .NET code, build Xamarin apps, execute Grunt and Gulp tasks, do code analysis with SolarQube, integrate Jenkins jobs, publish NuGet packages, run cloud-based load tests, copy files to a machine, deploy a SQL database to Azure, publish a web app or cloud service to Azure, … It has also many utility tasks and there is a collection with free third-party tasks in the MarketPlace.
VSTS Build 2015 also supports gated builds (currently only for Git) which means that new builds can be triggered automatically when a build has been successful. e.g. First CI build with unit tests, then deploy to Azure and execute integrations tests and finally deploy it to a test or production environment.
VSTS Build 2015 offers many tasks that can be added as steps in your build process. But when building your software, quite often you need custom steps. This can be implemented with the utility tasks Batch Script, Command Line and PowerShell. You can also make your own build task extensions by packaging PowerShell or Typescript scripts and upload them to the private or public MarketPlace. In this article I will cover some techniques how to implement PowerShell scripts and work with build variables and arguments, how to load custom C# .NET assemblies and how to create extensions and upload them to VSTS.
Use PowerShell task in build definition
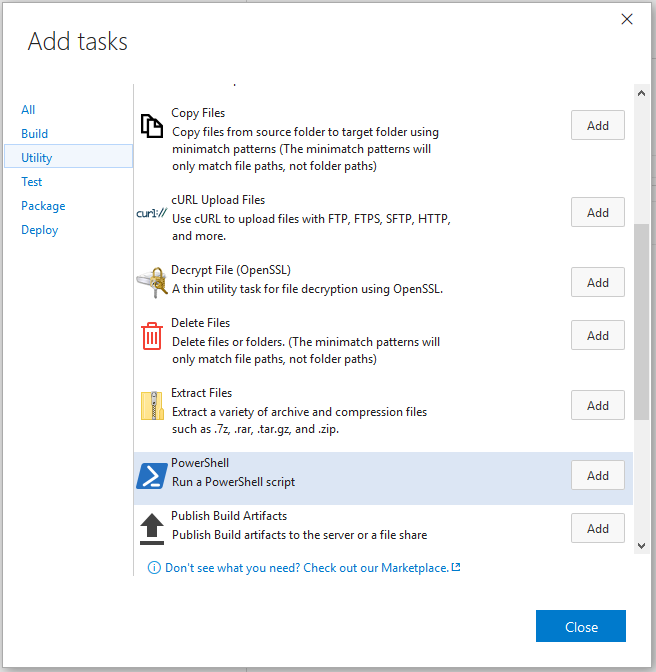
So I will start with creating a new empty build definition in the VSTS Portal. Then add a PowerShell task from the Utility category.
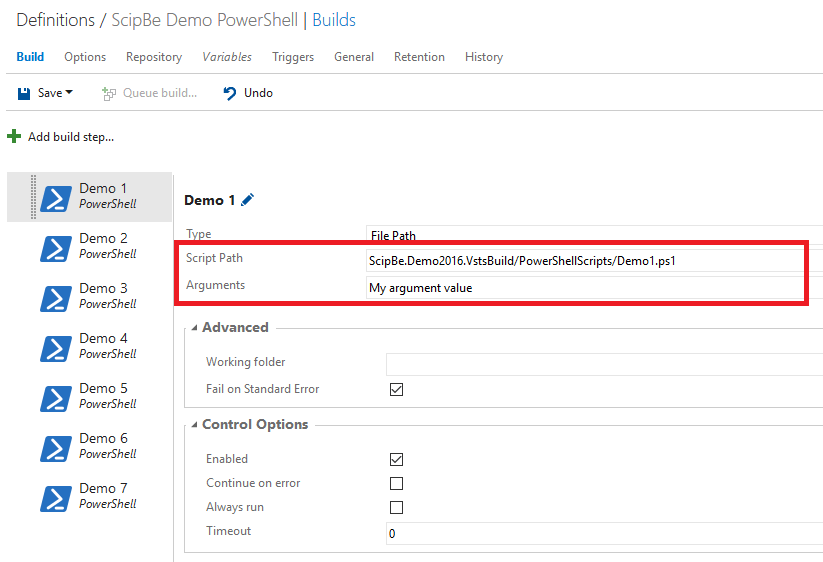
Now you have to specify the PowerShell script. You can write an inline script or refer to a file that is under version control. So make sure the script is checked-in.
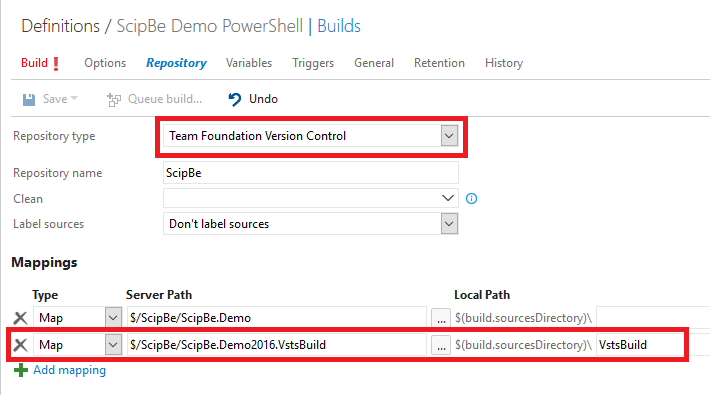
When you are using Git, then the PowerShell script should be included in the path of your repository. When using Team Foundation Version Control (TFVC) the PowerShell script can be included in another repository or branch. So to make sure to specify a mapping in the Repository tab page.
More info about the PowerShell task can be found at: https://www.visualstudio.com/docs/build/steps/utility/powershell
Console output
In a PowerShell script you can write text to the output window of the build. By calling Write-Host text will be send to console output as normal text.
Write-Host "Normal text in PowerShell script"By calling Write-Warning the console output will be preceded by "WARNING: ".
Write-Warning "Warning in PowerShell script"If you want the text being displayed in yellow, then call
Write-Host "##vso[task.logissue type=warning;]Warning in PowerShell script with VSTS Logging Command"
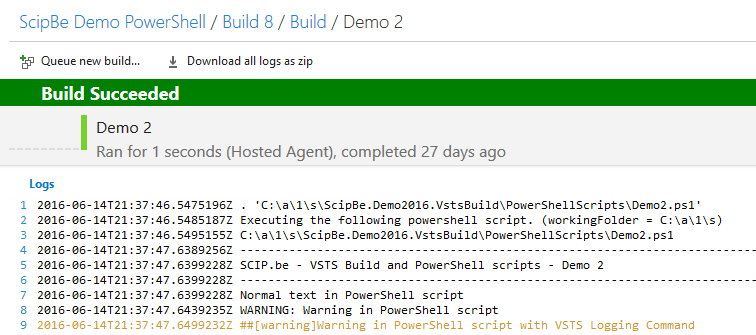
This is a specific VSTS logging command. You can see the full list of the available commands at: https://github.com/Microsoft/vsts-tasks/blob/master/docs/authoring/commands.md
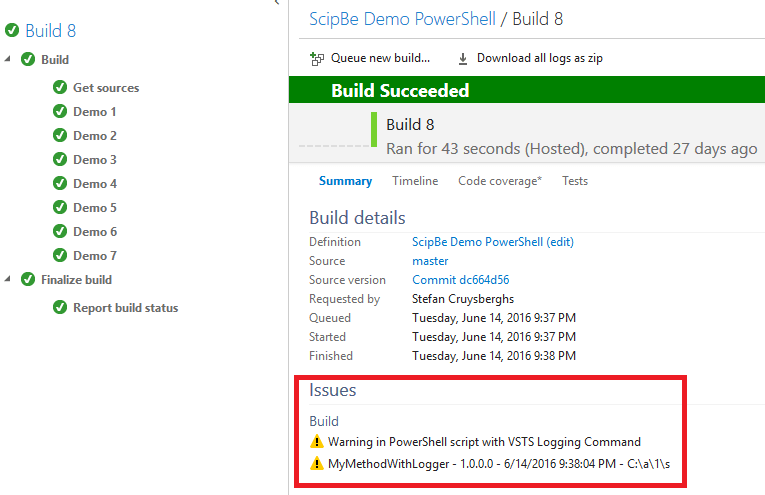
Another advantage of using the VSTS logging command is that these warnings will be shown in the list of issues of your build.
By calling Write-Error the console output will be preceded by "ERROR: ".
Write-Error "Error in PowerShell script"If you want the text being displayed in red, then call
Write-Host "##vso[task.logissue type=error;]Error in PowerShell script with VSTS Logging Command"Success or fail
If your script fails, then you have to call exit 1. If it is successful make sure to end it with exit 0.
if ($exitWithError -eq "true")
{
  Write-Host "Build task failed"
  exit 1
}
else
{
  Write-Host "Build task succeeded"
  exit 0
}
Build variables
The build process has a lot of environment variables about the Team Project, the Build Agent and the Build itself. Following page describes all the available environment variables: https://www.visualstudio.com/docs/build/define/variables . If you want to reference them in a PowerShell script you should use $env:VARIABLE_NAME (in uppercase and with underscore)
Write-Host "The sources directory is $env:BUILD_SOURCESDIRECTORY"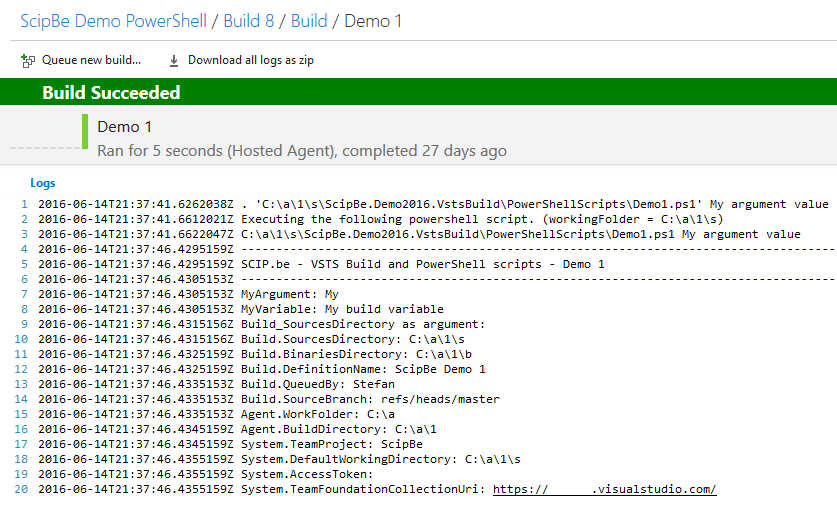
Custom environment variables
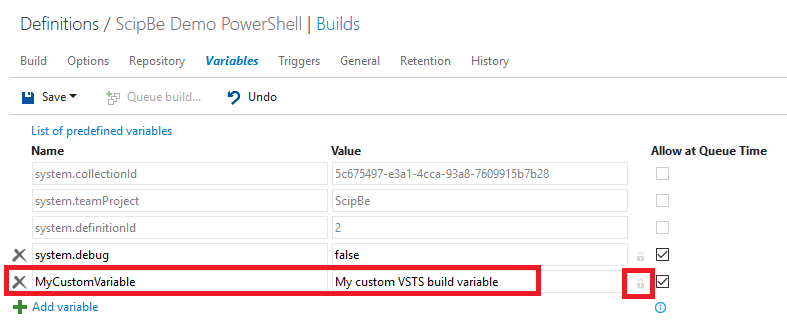
You can also define your own custom variables in the tab page Variables. Just give them a name and a value. You can optionally indicate that the value contains a secret by clicking on the lock icon. The value will be encrypted. The variable can be used in script but you can’t write the value to the console output.
In scope of script
In the PowerShell script you can reference the variables with $env:VariableName. You can also update it but the updated value is only accessible in the scope of the script.
Write-Host "My custom variable is $env:MyCustomVariable"
Persistent values
If you want to update a variable so that the new value is available outside the scope of the script so you can use it in subsequent tasks, then you have to call the setvariable task of the VSTS logging commands.
Write-Host "##vso[task.setvariable variable=MyCustomVariable]Persistent value for MyCustomVariable"Arguments
You can also pass arguments to your script. Just add a param section at the top of your PowerShell script
param
(
    [string] $myArgument
)
You can specify the values in the Arguments property of the PowerShell task. If you want to pass environment variables, then you should pass them using the syntax $(variablename).

PowerShell Examples
Let me start with a couple of examples and ideas how to use PowerShell scripts in the build process:Replace a strings in files
PowerShell is a very powerful scripting language and in next example I will show you how to search for a string and replace it in a source file. The first replace is done with PowerShell piping and filtering.
Write-Host "SCIP.be - VSTS Build and PowerShell scripts - Demo - Replace text with piping"

$fileName = "$env:BUILD_SOURCESDIRECTORY\ScipBe.Demo2016.VstsBuild\ScipBe.Demo2016.VstsBuild.BuildTasks\CustomBuildTask.cs"

(Get-Content $fileName) |
Foreach-Object { $_ -replace "1.0.0.0", "1.0.0.1" } |
Out-File $fileName
The replace in this second example is done by using the File class in the System.IO .NET assembly.
Write-Host "SCIP.be - VSTS Build and PowerShell scripts - Demo - Replace text with .NET class"

$fileName = "$env:BUILD_SOURCESDIRECTORY\ScipBe.Demo2016.VstsBuild\ScipBe.Demo2016.VstsBuild.BuildTasks\CustomBuildTask.cs"
Write-Host "FileName: $fileName"
$content = [System.IO.File]::ReadAllText($fileName)
$content = $content.Replace("1.0.0.0", "1.0.0.1")
[System.IO.File]::WriteAllText($fileName, $content)
Execute LinqPad script and save result as HTML
I use LinqPad a lot to implement and execute small utility scripts to access databases, access Azure Storage, read and process XML files, copy or update files, call services, … The great thing about LinqPad is that you can show a nice report with results and export it as HTML or CSV file. Executing a LinqPad script with the command line tool LPRun can be implemented in a PowerShell script so it could be nice approach to save a HTML report of some actions in the drop folder of your build.
void Main(string path)
{
  var recent = DateTime.Now.AddMinutes(-10);
  var recentUpdatedFiles = Directory.EnumerateFiles(path, "*.cs", SearchOption.AllDirectories)
  .Select(f => new FileInfo(f))
  .Where(f => f.LastWriteTime > recent)
  .Select(f => new { Directory = f.Directory.Name, FileName = f.Name, f.LastWriteTime });
  recentUpdatedFiles.Dump();
}
Write-Host "SCIP.be - VSTS Build and PowerShell scripts - Demo - LinqPad"
$linqPadPath = "$env:BUILD_SOURCESDIRECTORY\ScipBe.Demo2016.VstsBuild\LinqPad"
$lprun = "$linqPadPath\Lprun.exe $linqPadPath\Demo1.linq $env:BUILD_SOURCESDIRECTORY > $env:DropFolder\UpdateCSharpFiles.html"
Invoke-Expression -Command:$lprunLoad custom .NET assembly
I’m not a PowerShell expert so I always prefer to write code in C#. For me it is easier to write advanced code that uses regex expressions to find and replace tags, modify configuration files, check in and checkout files in version control, deploy special features to Azure, … in C# code. I will show you how you can create a C# .NET assembly and use it in a PowerShell script.
This is a very simple C# .NET class to demonstrate the interaction with PowerShell and build tasks.
using System;

namespace ScipBe.Demo2016.VstsBuild.BuildTasks
{
    public class CustomBuildTask
    {
        public static string MyStaticMethod(string text)
        {
            return "MyStaticMethod - " + DateTime.Now + " - " + text;
        }

        public string MyMethod(string text)
        {
            return "MyMethod - " + DateTime.Now + " - " + text;
        }
    }
}
Call methods from .NET class
Loading an assembly can be done by calling LoadFile from the System.Reflection assembly but the recommended solution for PowerShell V3 is to use the Add-Type cmdlet. Be aware that the assembly cannot be unloaded and that PowerShell uses a single AppDomain. If you want to avoid this you can use the Start-Job cmdlet to start a background process but this is not advisable in a build task. So in the PowerShell script, load the assembly first and then a static method can be called like this:
Write-Host "SCIP.be - VSTS Build and PowerShell scripts - Demo - Load custom assembly"

$assemblyPath = "$env:BUILD_SOURCESDIRECTORY\ScipBe.Demo2016.VstsBuild\Assemblies\ScipBe.Demo2016.VstsBuild.BuildTasks.dll"
Write-Host "Assembly path: $assemblyPath"

## [System.Reflection.Assembly]::LoadFile($assemblyPath)
Add-Type -LiteralPath $assemblyPath
$result = [ScipBe.Demo2016.VstsBuild.BuildTasks.CustomBuildTask]::MyStaticMethod($env:BUILD_SOURCESDIRECTORY)
Write-Host "Result MyStaticMethod: $result"
Creating an instance of an object and calling methods or accessing properties can be done like this:
$customBuildTask = New-Object ScipBe.Demo2016.VstsBuild.BuildTasks.CustomBuildTask
$result = $customBuildTask.MyMethod($env:BUILD_SOURCESDIRECTORY)
Write-Host "Result MyMethod: $result"
Output from .NET class
When writing output to the Console in C# it will automatically also be visible in the log of build.using System;
namespace ScipBe.Demo2016.VstsBuild.BuildTasks
{
public class CustomBuildTask
{
public string MyMethodWithConsole(string text)
{
var result = "MyMethodWithConsole - " + DateTime.Now + " - " + text;
Console.WriteLine(result);
return result;
}
}
}Events from .NET class to PowerShell
If you want to use the output colors for warnings and errors, then you have to create event handlers in your .NET class and subscribe to them in your PowerShell script. So next example shows you a .NET EventLogger class.
using ScipBe.Demo2016.VstsBuild.BuildTasks.Core.Interfaces;
using System;

namespace ScipBe.Demo2016.VstsBuild.BuildTasks.Core.Providers
{
    public class LogEventArgs : EventArgs
    {
        public string Severity { get; internal set; }
        public string Text { get; internal set; }
    }

    public delegate void LogEventHandler(object sender, LogEventArgs e);

    public class EventLogger : ILogger
    {
        public static event LogEventHandler LogEvent;

        public SeverityEnum SeverityLevel { get; set; }

        public void Write(string text, params object[] parameters)
        {
            Write(SeverityEnum.Info, text, parameters);
        }

        public void Write(SeverityEnum severity, string text, params object[] parameters)
        {
            if (severity >= SeverityLevel)
            {
                LogEvent?.Invoke(this, new LogEventArgs() { Severity = severity.ToString(),
                  Text = string.Format(text, parameters) });
            }
        }
    }
}
In my BuildTasks assembly I created 2 providers of my ILogger interface, one that just calls Console.WriteLine and the other one the will call EventLogger to trigger the LogEvent
using System;

namespace ScipBe.Demo2016.VstsBuild.BuildTasks
{
    public class CustomBuildTask
    {
        public string MyMethodWithConsoleLogger(string text)
        {
            var result = "MyMethodWithLogger - " + DateTime.Now + " - " + text;

            var logger = new ConsoleLogger();
            logger.Write(SeverityEnum.Info, result);
            logger.Write(SeverityEnum.Warn, result);
            return result;
        }

        public string MyMethodWithEventLogger(string text)
        {
            var result = "MyMethodWithLogger - " + DateTime.Now + " - " + text;

            var logger = new EventLogger();
            logger.Write(SeverityEnum.Info, result);
            logger.Write(SeverityEnum.Warn, result);
            return result;
        }

    }
}Write-Host "SCIP.be - VSTS Build and PowerShell scripts - Demo - Event Logger"
function Log ([string]$Severity, [string]$Text)
{
## Use one of the VSTS Build environment variables to check if we execute the PowerShell script
## on a local machine or on the VSTS Build server
$isLocal = !$env:SYSTEM_TEAMPROJECT
if ($Severity -eq "Fatal")
{
if ($isLocal -eq $true) { Write-Error $Text } else { Write-Error "##vso[task.logissue type=error;]$Text" }
}
if ($Severity -eq "Error")
{
if ($isLocal -eq $true) { Write-Error $Text } else { Write-Error "##vso[task.logissue type=error;]$Text" }
}
elseif ($Severity -eq "Warn")
{
if ($isLocal -eq $true) { Write-Warning $Text } else { Write-Host "##vso[task.logissue type=warning;]$Text" }
}
else
{
Write-Host $Text
}
}
function RegisterEventLogger
{
$logEventAction =
{
Log $EventArgs.Severity $EventArgs.Text
}
$logEvent = Get-EventSubscriber | Where-Object { $_.SourceIdentifier -eq "ScipBe.EventLogger.LogEvent" } | measure
if ($logEvent.Count -eq 0)
{
$eventLogger = [ScipBe.Demo2016.VstsBuild.BuildTasks.Core.Providers.EventLogger]
Register-ObjectEvent -InputObject $eventLogger -SourceIdentifier "ScipBe.EventLogger.LogEvent" -EventName LogEvent -Action $logEventAction
}
}
function UnregisterEventLogger
{
$logEvent = Get-EventSubscriber | Where-Object { $_.SourceIdentifier -eq "ScipBe.EventLogger.LogEvent" } | measure
if ($logEvent.Count -eq 1)
{
Unregister-Event -SourceIdentifier "ScipBe.EventLogger.LogEvent"
}
}
$assemblyPath = "$env:BUILD_SOURCESDIRECTORY\ScipBe.Demo2016.VstsBuild\Assemblies\ScipBe.Demo2016.VstsBuild.BuildTasks.dll"
Write-Host "Assembly path: $assemblyPath"
Add-Type -LiteralPath $assemblyPath
RegisterEventLogger
$customBuildTask = New-Object ScipBe.Demo2016.VstsBuild.BuildTasks.CustomBuildTask
$result = $customBuildTask.MyMethodWithEventLogger($env:BUILD_SOURCESDIRECTORY)
Write-Host "Result MyMethodWithEventLogger: $result"
UnregisterEventLoggerEnvironment variables in .NET class
I already showed you some different ways to pass the build variables and you own environment variables to a PowerShell script and then pass them to your methods in a C# .NET class. I prefer the approach to pass arguments but if you want you can also access all the environment variables of your (build) machine in C# code by calling Environment.GetEnvironmentVariables().using System;
namespace ScipBe.Demo2016.VstsBuild.BuildTasks
{
public class CustomBuildTask
{
public static void ShowEnvironmentVariables()
{
var envVars = Environment.GetEnvironmentVariables();
foreach (var key in envVars.Keys)
{
Console.WriteLine("{0}: {1}", key, envVars[key]);
}
}
}
}Custom VSTS build tasks
If you want to go a step further then creating VSTS build extensions is the way to go. This feature can be compared with the custom activities that you could implement for the TFS XAML builds. A custom VSTS build extension is just a package with a task.json meta data file, an icon and a PowerShell, JavaScript or TypeScript script. Once it is uploaded to VSTS it will be included in the list of available tasks in the VSTS build portal.
TFX: TFS Cross Platform Command Line Interface
Jeff Bramwell wrote a very nice article about this. The source of all the VSTS builds tasks can be found in GitHub. So take a look at some simple tasks to get familiar how this works. There are multiple ways to upload your custom build task to VSTS but I prefer to use the TFX (TFS Cross Platform Command Line Interface) tool. This is a utility that interacts with Visual Studio Team Services and Team Foundation Server and it requires NodeJS 4.0 or later. Read the instructions on the website how to install it. https://github.com/Microsoft/tfs-cliCreate task
First you have to create a task.json file. This file defines the meta data of the task and its properties in the UI of the VSTS portal. You can specify its name and version, create groups and inputs, specify the type of inputs or make them required, … You can start from a template by calling the TFX Create command: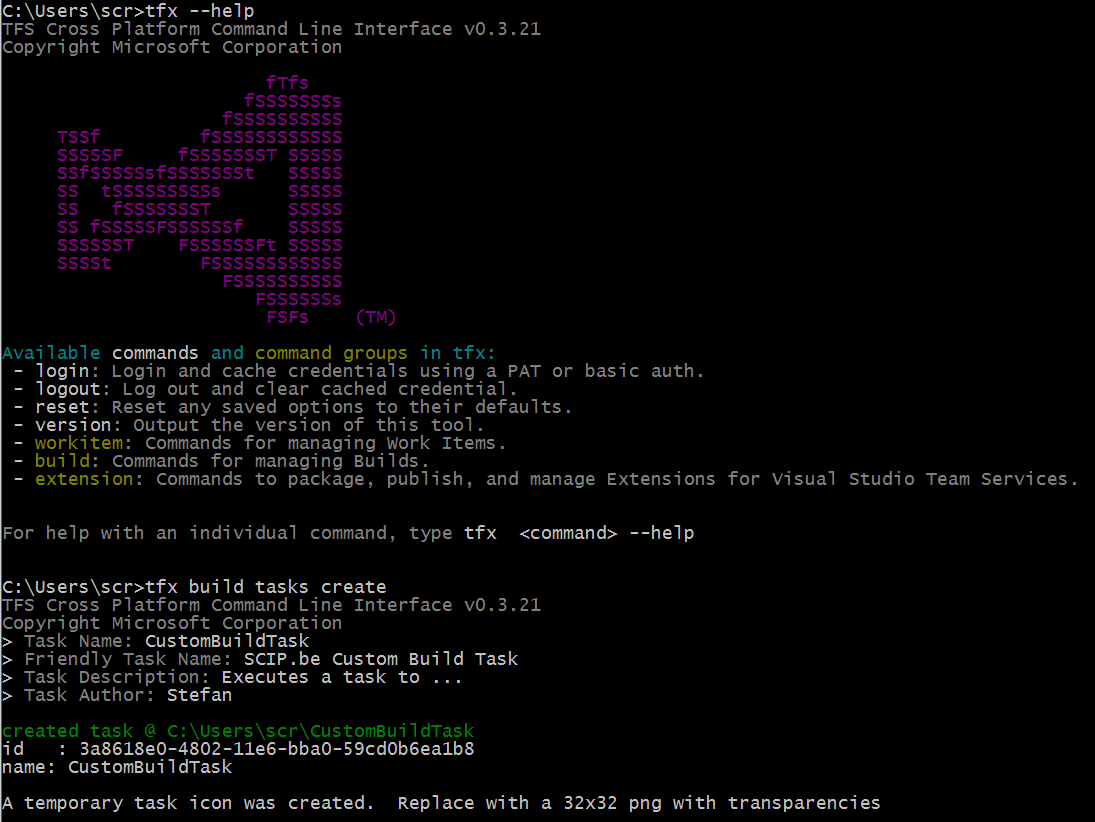
This will create a task.json file, a icon.png 32x32 image and a sample JavaScript and PowerShell script.

The generated PowerShell scripts needs the vsts-task-lib https://github.com/Microsoft/vsts-task-lib. This library can be useful but is not required so just remove the 2 scripts and include your own PowerShell script. Make sure to update the execution part in the task.json file from PowerShell3 to PowerShell. You can also include your custom C# .NET assembly in the same folder.

Following task.json file shows you some of the features.
{
    "id": "7706568D-C8D6-417B-9B11-6EBCF45071BB",
    "name": "CustomBuildTask",
    "friendlyName": "SCIP.be Custom Build Task",
    "description": "Demo of a custom build tasks in Visual Studio Team Services",
    "helpMarkDown": "For more information see ...",
    "category": "Utility",
    "visibility": [
        "Build",
        "Release"
    ],
    "author": "ScipBe",
    "version": {
        "Major": 1,
        "Minor": 0,
        "Patch": 3
    },
    "groups": [
        {
            "name": "myGroup1",
            "displayName": "Title of first group",
            "isExpanded": true
        },
        {
            "name": "myGroup2",
            "displayName": "Title of second group",
            "isExpanded": true
        }
    ],
    "inputs": [
      {
        "name": "myStringProperty",
        "type": "string",
        "label": "My string property",
        "defaultValue": "",
        "required": true,
        "helpMarkDown": "This is an example of a string property",
        "groupName": "myGroup1"
      },
      {
        "name": "myBooleanProperty",
        "type": "boolean",
        "label": "My boolean property",
        "defaultValue": false,
        "required": true,
        "helpMarkDown": "This is an example of a boolean property",
        "groupName": "myGroup2"
      }
    ],
    "minimumAgentVersion": "1.95.0",
    "instanceNameFormat": "Custom Build Task $(message)",
    "execution": {
        "PowerShell": {
            "target": "$(currentDirectory)\\CustomBuildTask.ps1",
            "argumentFormat": "",
            "workingDirectory": "$(currentDirectory)"
        }
    }
}
The values of the properties will be passed to the PowerShell script so you only have to define input parameters with the same name.
[CmdletBinding()]
param(
    [string][Parameter(Mandatory=$true)][ValidateNotNullOrEmpty()] $myStringProperty
    [bool][Parameter(Mandatory=$true)] $myBooleanProperty
)

Write-Verbose "Entering script CustomBuildTask.ps1"
try {
    Write-Host "BUILD_SOURCESDIRECTORY: $env:BUILD_SOURCESDIRECTORY"
    Write-Host "My string property: $myStringProperty"
    Write-Host "My boolean property: $myBooleanProperty"
    if(-not ($env:BUILD_SOURCESDIRECTORY))
    {
        Write-Warning "Please provide following global variables"
        Write-Host "BUILD_SOURCESDIRECTORY: VSTS Build environment variable with path to sources"
        exit 1
    }
    Add-Type -LiteralPath ".\ScipBe.Demo2016.VstsBuild.BuildTasks.dll"
    $result = [ScipBe.Demo2016.VstsBuild.BuildTasks.CustomBuildTask]::MyStaticMethod($env:BUILD_SOURCESDIRECTORY)
    Write-Host "Result MyStaticMethod: $result"

    $customBuildTask = New-Object ScipBe.Demo2016.VstsBuild.BuildTasks.CustomBuildTask
    $result = $customBuildTask.MyMethod($env:BUILD_SOURCESDIRECTORY)
    Write-Host "Result MyMethod: $result"

    $result = $customBuildTask.MyMethodWithConsole($env:BUILD_SOURCESDIRECTORY)
    Write-Host "Result MyMethodWithConsole: $result"

    $result = $customBuildTask.MyMethodWithConsoleLogger($env:BUILD_SOURCESDIRECTORY)
    Write-Host "Result MyMethodWithConsoleLogger: $result"

    [ScipBe.Demo2016.VstsBuild.BuildTasks.CustomBuildTask]::ShowEnvironmentVariables()

} finally {
    Write-Verbose "Leaving script CustomBuildTask.ps1"
}
Upload task
Now you start uploading your custom build task to VSTS by using a couple of TFX commands. The first thing you have to do is to authenticate to VSTS. Therefore you need alternate credentials or an access token. See the blogpost of Rene van Osnabrugge how to do this.
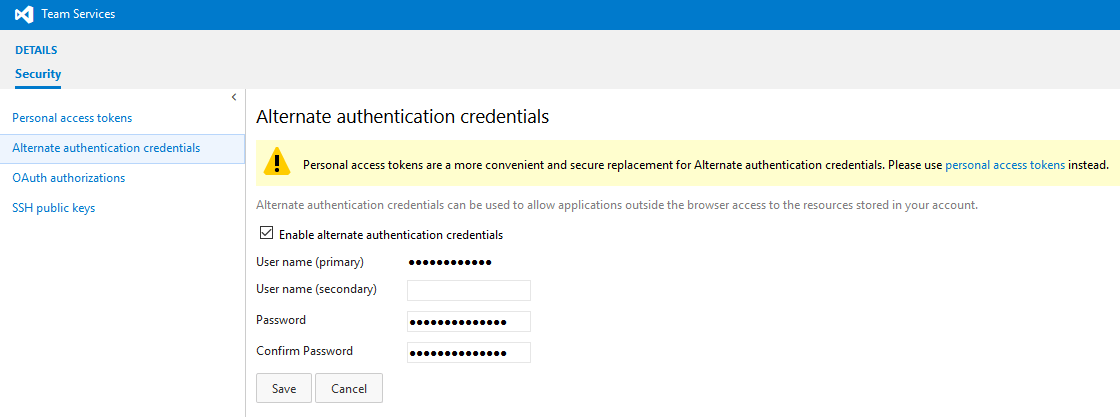
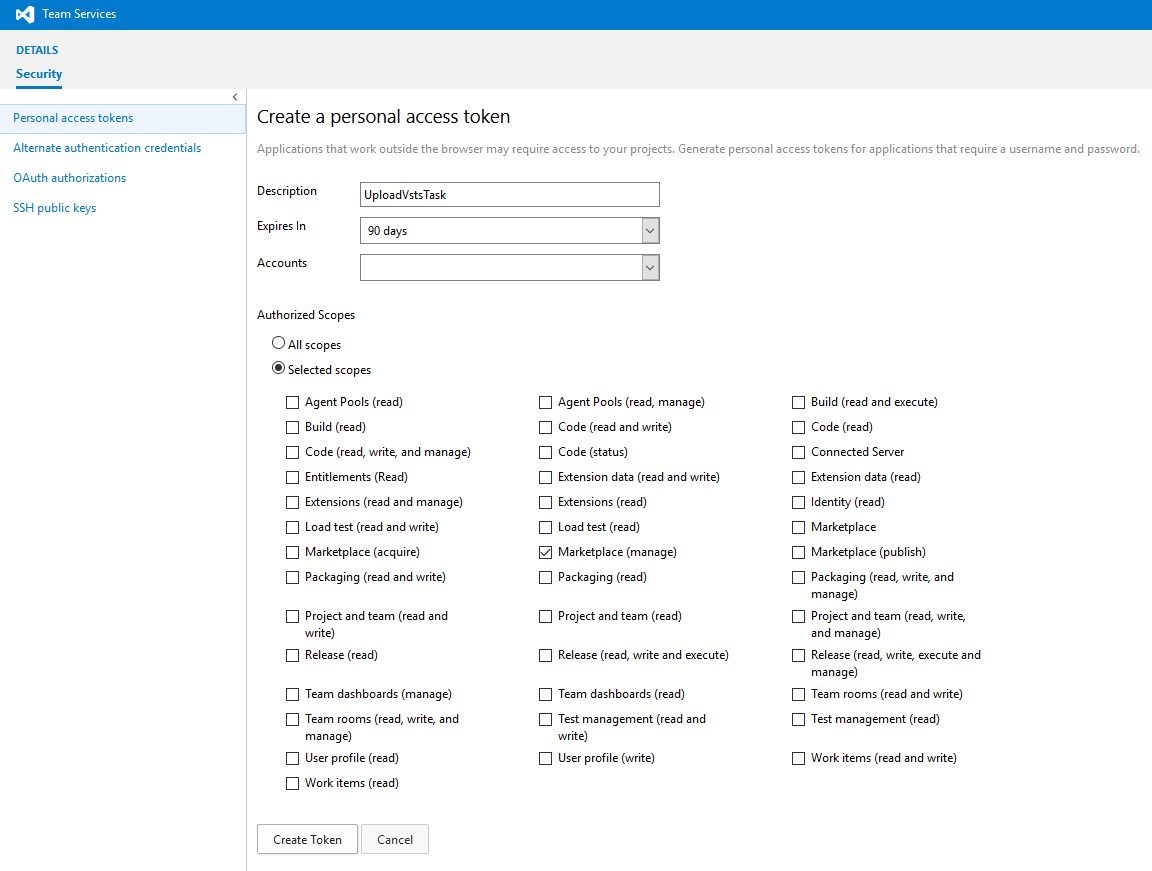
Once you have a token or credentials, you can pass them to the TFX Login command:
tfx login --service-url https://youraccount.visualstudio.com/DefaultCollection --token z4fozf74qtholmv3cfjxmmtq3sfqwyzwmllzudiiuboq2dqeefat2tfx login --auth-type basic --service-url https://youraccount.visualstudio.com/DefaultCollection --username yourusername --password yourpasswordNow it is easy to upload your custom build task to VSTS. Just execute the TFX Upload command and pass the path to the folder:
tfx build tasks upload --task-path .\CustomBuildTaskUse task in build definition
If the upload was succesful then you can add your custom build task to the build definition in the VSTS portal. Once it is added, you can see the groups and inputs and labels and help information.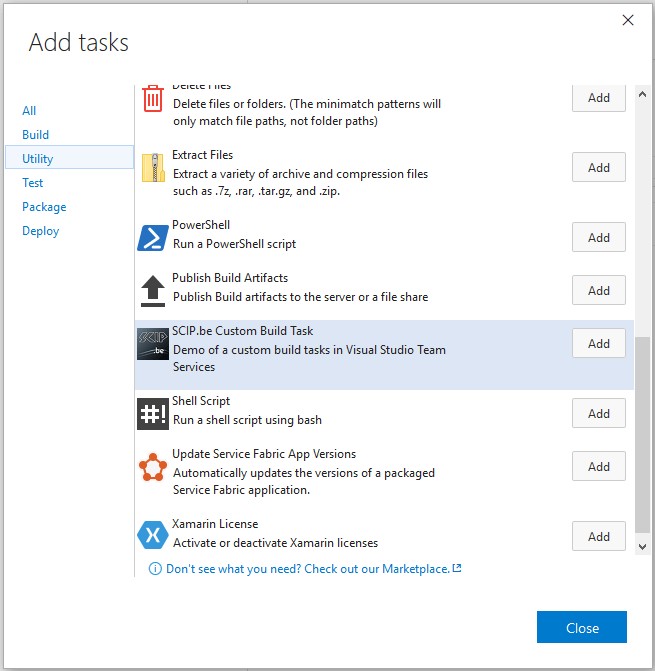
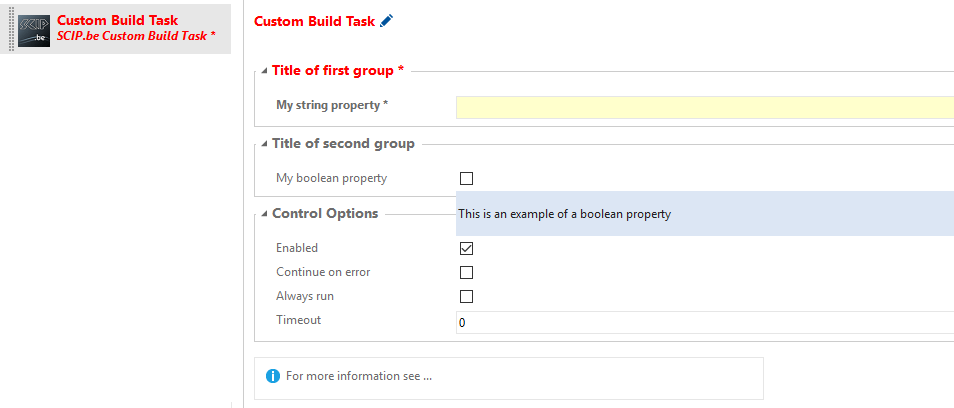
When you want to install a newer version, then you first have to delete the task from VSTS with the TFX Delete command. Don't forget increase the version number in the task.json file and then upload it again.
tfx build tasks delete --task-id 7706568D-C8D6-417B-9B11-6EBCF45071BBSo this was a short overview of the different techniques you can use to customize the build process in VSTS. I hope it was useful to get started. And let's hope that Microsoft will improve these features, tools and documentation in the near future.
